Can python be used for android app development? You might have crossed this question if you are a python developer or android developer. The answer is. Yes. You can definitely develop android app using python alone. Nothing else is required. This posts shows you how to develop an android app using python with native looking gui.
Table of Contents
Video on building an android app apk from kivyMD python code
Download the KivyMD python code and built android APK
The python code can be accessed from this link
The built apk can be downloaded from this link
Tools required to build android app in python

Why python for android app development?
While languages like java or kotlin are available for android app development, python can be used which is a versatile language and has a following advantages.
- It is easy to write and learn python
- It is dynamically typed
- It is free and opensource
- Large amount of libraries already exist as modules via pip
- It is cross platform
Clone of Instagram android app using python
The procedure to develop an android app of instagram clone is as follows
- writing the front end or gui
- writing the back end
Android gui in python
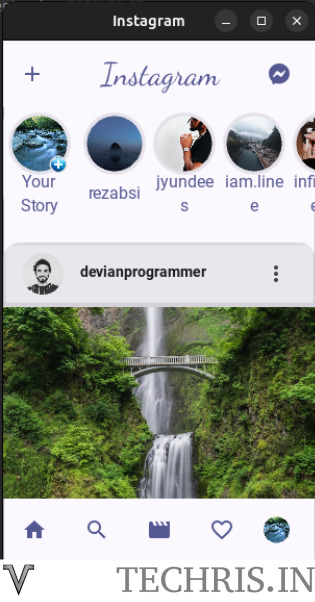
This post focuses mainly on developing the front end or gui for the android app. For this the cross platform framework kivy and kivy material design kivymd are used. This code is a fork of the instagram clone android app in python that is available in github. The existing code was developed using earlier versions of kivymd that is not wokring any more due to the latest developments and modifications in the latest kivymd version. Further, the existing code was not converted to an apk. This is also addressed in this post.
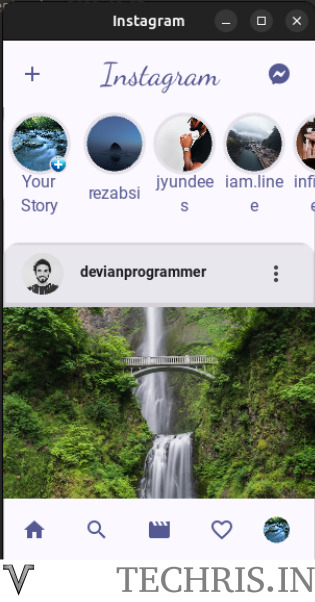
The figure below shows the gui developed in python code.
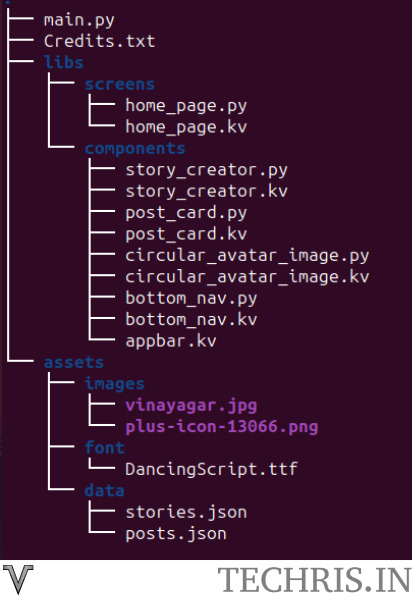
Folder structure of the App Code
The files are arranged in the following manner. The main.py is the python file to run. home_page.py in the libs/screens folder contains the main screen. The components are in the libs/components folder.
Parts of the android gui layout
The gui is made of several components. They are are housed in the mother element that is the MDScreen. Contents of the main.py is given below
As seen in the main.py file, the home_page.kv is loaded first and the contents of the home_page.kv can be visualised as below.
from kivymd.app import MDApp
from kivy.core.window import Window
from kivy.lang.builder import Builder

from libs.screens.home_page import HomePage


class InstagramApp(MDApp):
    def build(self):
        # Window.size = [300, 500]
        # self.theme_cls.theme_style = "Dark"
        # self.theme_cls.primary_palette = "Red"
        self.load_all_kv_files()
        # self.dispatch('on_enter')
        return HomePage()

    def load_all_kv_files(self):
        Builder.load_file('libs/screens/home_page.kv')
        Builder.load_file('libs/components/appbar.kv')
        Builder.load_file('libs/components/story_creator.kv')
        Builder.load_file('libs/components/bottom_nav.kv')
        Builder.load_file('libs/components/circular_avatar_image.kv')
        Builder.load_file('libs/components/post_card.kv')

    def on_start(self):
        super().on_start()
        print('Executing enter')

        v=1
        self.root.dispatch('on_enter')


if __name__ == "__main__":
    InstagramApp().run()
As seen in the main.py file, the home_page.kv is loaded first and the contents of the home_page.kv can be visualised as below.
#:import get_color_from_hex kivy.utils.get_color_from_hex
#:import StoryCreator libs.components.story_creator.StoryCreator
#:import BottomNav libs.components.bottom_nav.BottomNav

:
    # md_bg_color: get_color_from_hex("#FFFFFF")
    md_bg_color: self.theme_cls.backgroundColor

    MDBoxLayout:
        orientation: 'vertical'

        # Appbar

        AppBar:
        MDBoxLayout: #MDB1
            orientation: "vertical"
            MDScrollView:  #SV1
                bar_width: 0
                MDBoxLayout: #MDB2
                    adaptive_height: True
                    spacing: 0
                    padding: 0
                    orientation: "vertical"
                    id: timeline
                    MDScrollView:  #SV2
                        bar_width: 0
                        size_hint_y: None
                        height: "130dp"
                        MDBoxLayout: #MDB3
                            adaptive_width: True
                            adaptive_height: True
                            spacing: 10
                            StoryCreator:
                                avatar: root.profile_picture

                            MDBoxLayout: #MDB4
                                adaptive_width: True
                                padding: 5
                                spacing: 5
                                id: stories

        BottomNav:
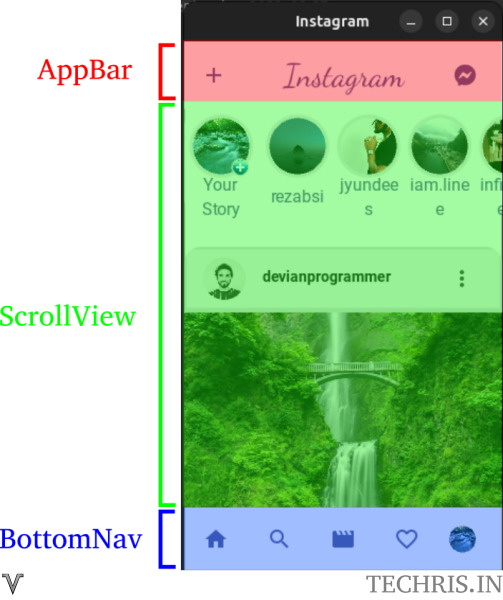
In the above figure, there are majorly three components. They are
- AppBar
- ScrollView
- BottomNav
AppBar
The AppBar is a MDTopAppBar class which can hold different icons.
<AppBar@MDTopAppBar>:
    type: "small"

    MDTopAppBarLeadingButtonContainer:

        MDActionTopAppBarButton:
            icon: "plus"
            theme_icon_color: "Custom"
            icon_color : self.theme_cls.primaryColor

    MDTopAppBarTitle:
        text: "Instagram"
        pos_hint: {"center_x": .5}
        theme_font_size: "Custom"
        font_size: "30dp"
        theme_font_name: "Custom"
        font_name: "assets/font/DancingScript.ttf"
        # text_color : 1,0,0,1
        text_color : self.theme_cls.primaryColor

    MDTopAppBarTrailingButtonContainer:

        MDActionTopAppBarButton:
            icon: "facebook-messenger"
            theme_icon_color: "Custom"
            icon_color : self.theme_cls.primaryColor
Plus icon is added to the MDTopAppBarLeadingButtonContainer and facebook-messenger icon is added to the MDTopAppBarTrailingButtonContainer. The title text of Instagram is stylized by the font DancingScript.ttf
Main content
The main content area is held by the MDBoxLayout. This MDBoxlayout needs to carry out three major tasks.
- All the components inside of it should scroll vertically
- The second scroll is in horizontal direction which is the story creator and other elements
- The timeline needs to be filled with timeline from other people
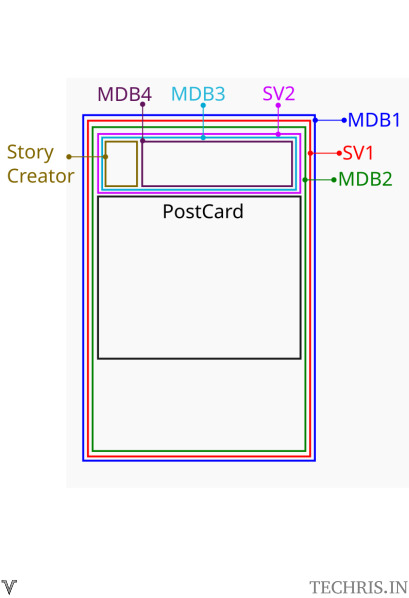
Hence the MDBoxlayout MDB1 is having several components arranged in a manner shown in the figure below
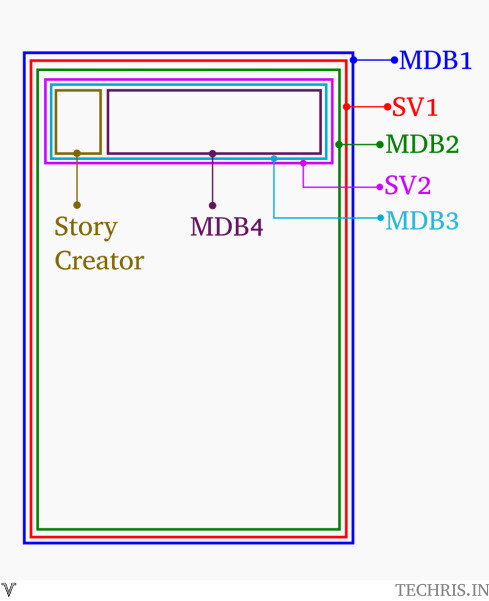
Here scrollview SV1 contains the elements and it scroll vertically. The timeline and the storycreator are housed inside. The second scroll view SV2 is for the horizontal scrolling. This affects only the story creator and the contents inside the MDBoxLayout MDB4 .
Initially only the story creator is added so that it will only be visible and all the other components are added through the code.
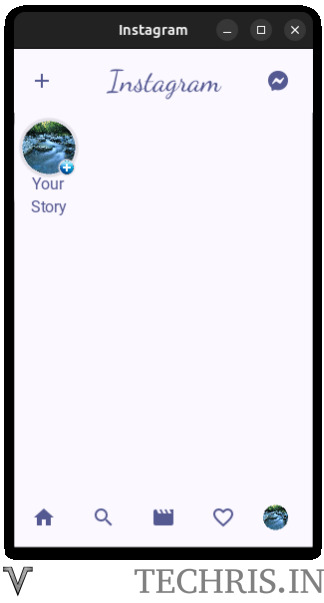
The home_page.kv will add the StoryCreator in MDB3. StoryCreator is a MDCard. Its code is given below.
    size_hint: None, None
    size: 60, 100  # 62,100
    # elevation: 0
    padding: 5 #,5,5,5
    spacing: 5
    theme_bg_color: "Custom"
    # md_bg_color: 1,0,0,1
    # md_bg_color: self.theme_cls.backgroundColor

    # MDBoxLayout:
    MDRelativeLayout:
    # MDFloatLayout:
        size_hint: None, None
        size: 60, 100 # 60,100
        # theme_bg_color: "Custom"
        # md_bg_color: 0.1, 0.1, 0.5, 1
        Circle: #C1
            radius: [60, ]  #60
            size: 60,60 # 60, 60
            theme_bg_color: "Custom"
            md_bg_color: 0.5, 0.5, 0.5, 1

        Circle: #C2
            radius: [57, ]
            size: 57, 57 # 57, 57
            theme_bg_color: "Custom"
            md_bg_color: 1, 1, 1, 1

        FitImage: #I1
            source: root.avatar
            size_hint: None, None
            size: 53, 53
            radius: [53]
            pos_hint: {"center_x": 0.5,"center_y": 0.6}

        Circle: #C3
            size_hint: None, None
            size: 17, 17
            md_bg_color: 1, 1, 1, 1
            radius: [17, ]
            pos_hint: {"center_x": 0.8,"center_y": 0.4}

        FitImage: #I2
            size_hint: None, None
            source: 'assets/images/plus-icon-13066.png'
            size: 15, 15
            md_bg_color: 0, 0, 1, 1
            radius: [15, ]
            pos_hint: {"center_x": 0.8,"center_y": 0.4}

        MDLabel:
            text: "Your Story"
            halign: 'center'
            pos_hint: {"center_x": 0.5,"center_y": 0.0}
            font_size: 11
            theme_text_color: 'Custom'
            text_color: self.theme_cls.primaryColor #0, 0, 0, 1


<Circle@MDCard> : # Common
    pos_hint: {"center_x": 0.5,"center_y": 0.6}
    size_hint: None, None
    elevation: 0
The size of the MDCard is 62, 100. Its main element is MDRelativeLayout which is equivalent to FLoatLayout. Details of the StoryCreator MDCard is shown in the figure below.
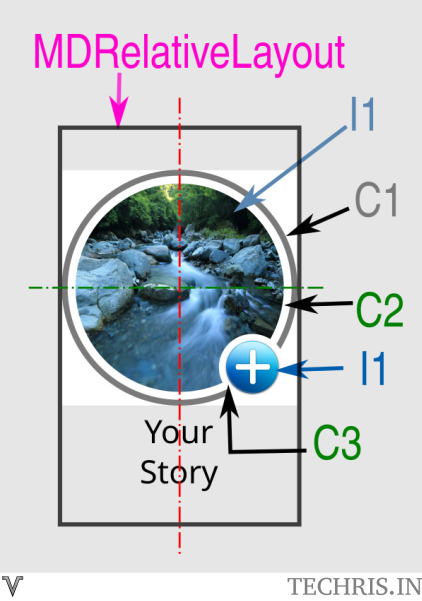
In the StoryCreator, a relativelayout is used. The size of RelativeLayout is same as its mother, StoryCreator@MDCard. The relative layout has several circles. each circle is is derived from the common MDCard defined at the bottom of the kv file. Each MDCard is customised to have a different colour and size. Each MDcard is named and the same is shown in the image above for reference. Each MDCard is positioned at center_x of 0.5 and center_y of 0.6. These values take the width and height of its parent, MDRelativeLayout and position them accordingly. Since all MDcards have same center_x and center_y, they will be placed one over another based on the order of their appearance in the kv file. The plus icon and the background are positioned based on the MDCard and the FitImage. At the end, a MDLabel is also added.
Function on_start will execute its contents after the screen is built. It is calling the function on_enter defined in the home_page.py. This function adds the stories to the MDBoxLayout MDB4 based on the id sories. The function list_stories reads the assets/data/stories.json file and add a CircularAvatarImage to the MDB4. CircularAvatarImage is also a MDCard that is simlilar to the StoryCreator discussed above. It should be noted that common name for the MDCard should be chosen carefully. If you define the same common name across multiple kv files, even if one entry is disabled, the python code will refer the entry defined some where else. It is suggested to have unique names of common items. For example, the MDCard is named Circle in story_creator.kv and MDCard in circular_avatar_image.kv is named as circle2.
    size_hint: None, None
    size: 62, 100
    elevation: 0
    theme_bg_color: "Custom"
    md_bg_color: self.theme_cls.backgroundColor

    MDRelativeLayout:
        size_hint: None, None
        size: 60, 100

        Circle2:
            radius: [50,]
            size: 60, 60
            md_bg_color: 1, 0, 0, 1

        Circle2:
            radius: [50,]
            size: 55, 55
            md_bg_color: 1, 1, 1, 1

        # profile picture
        FitImage:
            source: root.avatar
            size_hint: None, None
            size: 53, 53
            radius: [53]
            pos_hint: {"center_x": 0.5,"center_y": 0.6}

        # Username
        MDLabel:
            text: root.name
            halign: 'center'
            pos_hint: {"center_x": 0.5 ,"center_y": 0.1}
            font_size: 11
            theme_text_color: 'Custom'
            text_color: self.theme_cls.primaryColor #0, 0, 0, 1


<Circle2@MDCard>
    size_hint: None, None
    elevation: 0
    pos_hint: {"center_x": 0.5,"center_y": 0.6}
The figure below shows several CircularAvatarImage added to MDB4.
The function list_posts in home_page.py will add several PostCards to the timeline MDBoxLayout (MDB2) with an id of timeline. The entries are referred from the json file assets/data/posts.json. Each block contains several variables such as avatar, post, caption, likes, comments, posted_ago. These variables will be used while adding new Post cards.
PostCardis also a MDCard. The code of PostCard is given below.
:
    orientation: 'vertical'
    size_hint_y: None
    height: "420dp"
    spacing: 2
    elevation: 0

    MDBoxLayout: #MDB5
        padding: 2
        adaptive_height: True

        MDListItem:
            MDListItemHeadlineText:
                text: f'[b][size=14]{root.username}[/size][/b]'
            MDListItemLeadingAvatar:
                source: root.avatar
                radius: [20, ]
            MDListItemTrailingIcon:
                icon: 'dots-vertical'

    FitImage: # Post
        adaptive_height: True
        source: root.post


    MDBoxLayout: # MDB6 Reactions
        padding: 5, 0, 0, 0
        spacing: 2
        adaptive_height: True


        MDIconButton:
            icon: 'heart-outline'

        MDIconButton:
            icon: 'message-outline'

        MDIconButton:
            icon: 'send-outline'

        Widget:

        MDIconButton:
            icon: 'bookmark-outline'


    MDBoxLayout: # MDB7 Likes
        orientation: 'vertical'
        padding: 5, 0, 0, 0
        spacing: 2
        adaptive_height: True

        MyLabel:
            text: f'{root.likes} likes'
            bold: True

        MyLabel:
            markup: True
            text: f'[b]{root.username}[/b] {root.caption}'

        HalfOpacityLabel:
            text: f'View all {root.comments} comments'


    MDBoxLayout: # MDB8 To add comment
        padding: 5, 0, 0, 0
        spacing: 2
        adaptive_height: True

        FitImage:
            source: root.profile_pic
            size_hint: None, None
            size: 20, 20
            radius: [20, ]

        HalfOpacityLabel:
            text: 'Add a comment...'

    MDBoxLayout: # MDB9 Posted time
        padding: 9, 0, 0, 0
        spacing: 0
        adaptive_height: True

        HalfOpacityLabel:
            font_size: 10
            text: f'{root.posted_ago} ago'


<MyLabel@MDLabel>
    adaptive_height: True
    font_size: 12

<HalfOpacityLabel@MyLabel>:
    theme_text_color: 'Custom'
    text_color: 0, 0, 0, 0.5
PostCard will occupy the its parent’s width. Its parent is MDBoxLayout MDB2. All all the post cards are stacked vertically. The height of the post card is defined as 420 dp. The appearance of the Post Card in the layout is shown in the figure below.
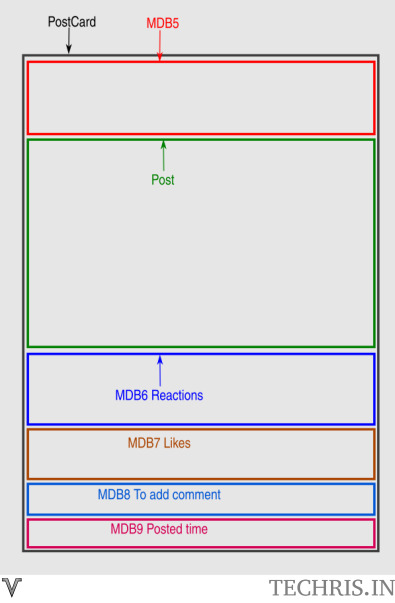
The Postcard contains several MDBoxLayout and FitImages as shown in the figure below. They all are stacked vertically. First MDBoxLayout MDB5 contains a MDListItem. The list Item contains a MDListItemHeadlineText, MDListItemLeadingAvatar and MDListItemTrailingIcon. The image is added below this MDB5. Next MDBoxLayout is MDB6 Reactions. This holds four MDIconButtons heart-outline, message-outline, send-outline and bookmark-outline. The Likes MDBoxLayout MDB7 contains three MDLabels arranged vertically, out of which the last one’s opacity level is reduced to have a different look. MDB8 comment MDBoxLayout is used to show the avatar image and the label to add a comment. The last MDBoxLayout MDB9 shows the time in which the post was posted.
Last item in the home_page.kv is the BottomNav which is a MDBoxLayout. Here four MDIconButtons and a FitImage are added horizontally and they are spaced equally.
Converting the Python Code to a Android apk
Now we have finished developing the gui, lets build the apk for android and install it in a physical android device. For this we need to have Python for android. Python for android will convert the kivymd based python code to a full fledged apk and aab. For the task at hand, lets focus to generate apk. Following command is executed in the terminal
p4a apk --private /home/gk/Documents/code --package org.techris.vin --name "Techris Social Media" --version 0.1 --bootstrap sdl2 --requirements python3==3.11.2,kivy,materialyoucolor,exceptiongroup,asyncgui,asynckivy,https://github.com/kivymd/KivyMD/archive/master.zip --sdk-dir /home/gk/Android/Sdk --ndk-dir /home/gk/Documents/android-ndk-r25b-linux/android-ndk-r25b --android-api 34 --ndk-api 21 --arch armeabi-v7a --arch arm64-v8a --permission INTERNET --icon /home/gk/Documents/logo.png --presplash /home/gk/Documents/logo.png --presplash-color red --debugHowever, this results in an error below
[INFO]: # Your distribution was created successfully, exiting.
[INFO]: Dist can be found at (for now) /home/gk/.local/share/python-for-android/dists/unnamed_dist_2
[DEBUG]: All possible dists: [<Distribution: name unnamed_dist_1 with recipes (hostpython3, libffi, openssl, sdl2_image, sdl2_mixer, sdl2_ttf, sqlite3, python3, sdl2, setuptools, six, pyjnius, android, kivy, exceptiongroup, requests, certifi, asynckivy, asyncgui, idna, urllib3, materialyoucolor, chardet)>, <Distribution: name unnamed_dist_2 with recipes (hostpython3, libffi, openssl, sdl2_image, sdl2_mixer, sdl2_ttf, sqlite3, python3, sdl2, setuptools, six, pyjnius, android, kivy, asyncgui, asynckivy, urllib3, idna, chardet, exceptiongroup, materialyoucolor, requests, certifi, https://github.com/kivymd/kivymd/archive/master.zip)>]
[DEBUG]: dist <Distribution: name unnamed_dist_1 with recipes (hostpython3, libffi, openssl, sdl2_image, sdl2_mixer, sdl2_ttf, sqlite3, python3, sdl2, setuptools, six, pyjnius, android, kivy, exceptiongroup, requests, certifi, asynckivy, asyncgui, idna, urllib3, materialyoucolor, chardet)> missing recipe https://github.com/kivymd/KivyMD/archive/master.zip
[DEBUG]: dist <Distribution: name unnamed_dist_2 with recipes (hostpython3, libffi, openssl, sdl2_image, sdl2_mixer, sdl2_ttf, sqlite3, python3, sdl2, setuptools, six, pyjnius, android, kivy, asyncgui, asynckivy, urllib3, idna, chardet, exceptiongroup, materialyoucolor, requests, certifi, https://github.com/kivymd/kivymd/archive/master.zip)> missing recipe https://github.com/kivymd/KivyMD/archive/master.zip
[DEBUG]: Dist matching ndk_api and recipe: []
[INFO]: No existing dists meet the given requirements!
Here the distribution was successfully created but it yells that no missing recipe https://github.com/kivymd/KivyMD/archive/master.zip
The same error is shown in the image below
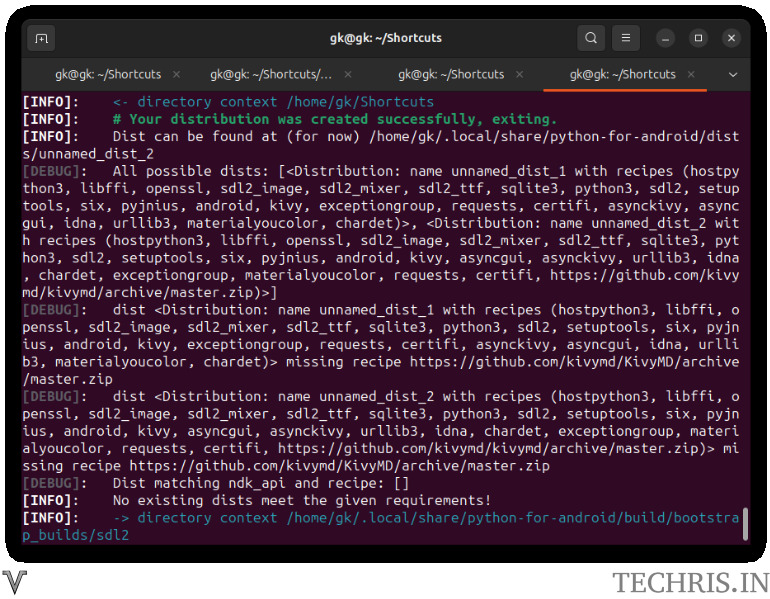
To solve this, instead of adding the kivymd master.zip in the requirements, the kivymd folder is added to the folder where the code exists as shown inthe figure below. Please let us know if you come across a better approach or how to solve this error.
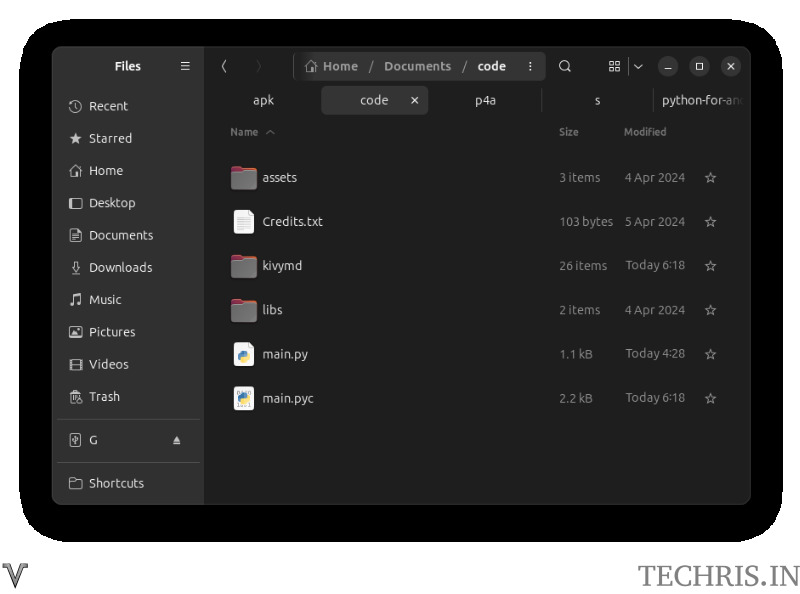
With the KivyMD added to the code folder, the kivymd master is removed from the requirements and the following command is executed
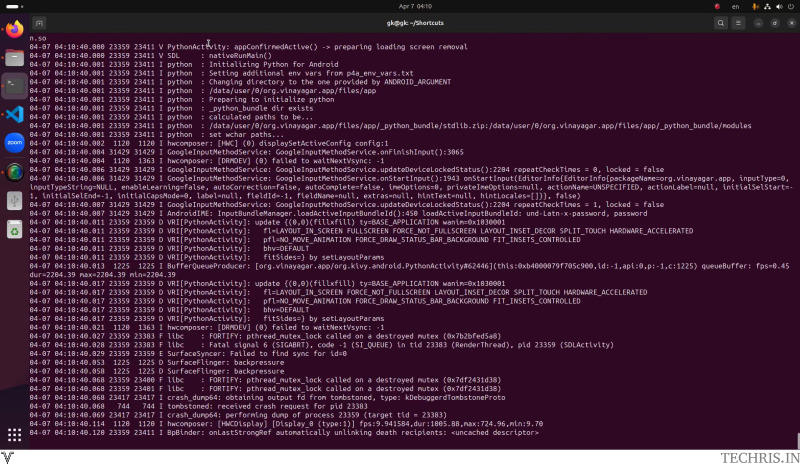
p4a apk --private /home/gk/Documents/code --package org.techris.vin --name "Techris Social Media" --version 0.1 --bootstrap sdl2 --requirements python3==3.11.2,kivy,materialyoucolor,exceptiongroup,asyncgui,asynckivy --sdk-dir /home/gk/Android/Sdk --ndk-dir /home/gk/Documents/android-ndk-r25b-linux/android-ndk-r25b --android-api 34 --ndk-api 21 --arch armeabi-v7a --arch arm64-v8a --permission INTERNET --icon /home/gk/Documents/logo.png --presplash /home/gk/Documents/logo.png --presplash-color red --debugIt is important to note that the python version is mentioned in the requirements. Without the version mentioned, the apk is build but the follwing error occurs while opeing the apk.
}
Apr 7 04:10
gk@gk:-/Shortcuts
preparing loading screen removal 04-07 04:10:40.008 23359 23411 V PythonActivity: appConfirmedActive()
04-07 04:10:40.000 23359 23411 nativeRunMain() Initializing Python for Android
SDL
04-07 04:10:40.001 23359 23411 python 04-07 04:10:48.001 23359 73411 I python
Setting additional env vars from p4a eny_vars.txt
04-07 04:10:40.001 23359 23411 I python 64-07 04:10:46.001 23359 23411 I python/data/user/B/org.vinayagar.app/files/app
Changing directory to the one provided by ANDROID ARGUMENT
04-87 04:19:40.081 23359 23411 1 python Preparing to initialize python
04-67 04:10:46.001 23359 23411 1 python python bundle dir exists
04-87 04:10:48.081 23359 23411 1 python 04-87 04:10:40.081 23359 23411 I
calculated paths to be…
python/data/user/8/org.vinayager.app/files/app/python bundle/stdlib.zip:/data/user/8/org.vinayagar.app/files/app/ python bundle/nodules
04-07 04:18:40.001 23359 23411 I python set wchar paths….
When the last line python set wchar paths is printer in the logcat output, the app crashes without printing any error messages. This is resolved by mentioning the python version number.
With all the errors resolved, the android apk is finally built from the kivymd based python code and the apk is installed in the android phone. The build command is also customised to have a app icon and pre splash screen. Following screenshots shows the app in the android, presplash screen and the opened app.
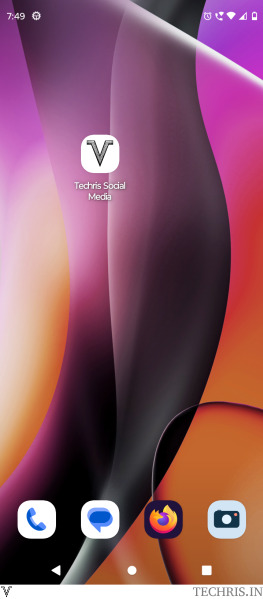
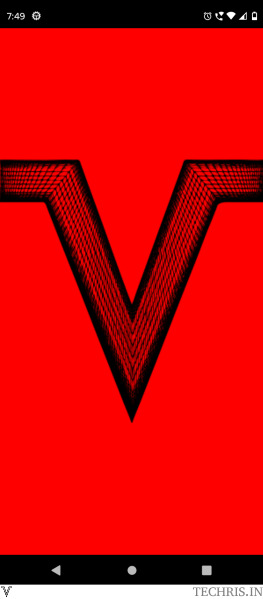
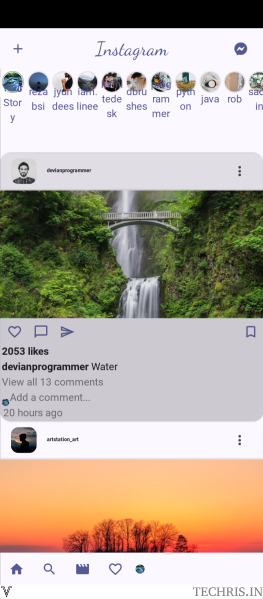
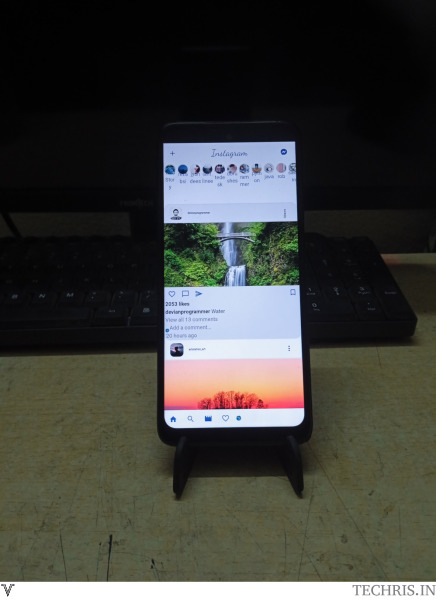
The layout needs to be customised a little to look better. As the focus of this post is to build an android apk from the python kivyMD based code, the effort is stopped here.
We hope following search terms will be useful to you if you are looking for the kivyMD, kivy, python, buildozer, python for android and android apk related queries.
- Best python android app
- Can Android run Python apps?
- Can I automate Android app using Python?
- Can I build iPhone apps using Python?
- Can I build large Android applications using Python?
- Can I develop an Android app using Python when I only have knowledge of Core Python?
- Can I install Python on Android?
- Can I make Android app by Python?
- Can I make an Android app using Python 3?
- Can Python be used for Android app development?
- Can mobile apps be developed using Python?
- Can we build a python program for Android?
- Can you use Python IDLE to create an Android app?
- Can you write a code in Python and convert it to an Android app?
- How do I make a Python PyQt Android app?
- How do I run Android apps for phones through Python?
- How do I turn python code into a program or app?
- Is Pydroid 3 safe?
- Is Pydroid 3 same as Python?
- Is Python available for Android phone?
- Is Python good for making apps?
- Is Python good for mobile apps?
- Is only the Python programming language enough to build an Android app?
- Python android apk github
- Python android apk latest version
- Python android apk mod
- Python android app development tutorial
- Python android app download
- Python android app for android
- Python android app free download
- Python android app github
- What is Pydroid 3 used for?
- What software is the better to build an Android app, Python or Java?
- Which is the best programming language for making Android apps?
- android app with python backend
- android studio download
- android-app using python github
- convert python code to android app online
- create a simple python application
- develop android apps using python: kivy
- how to convert python code into android app
- how to convert python code to mobile app
- how to create android app using pycharm
- how to create python application for windows
- how to make an app with python for beginners
- how to make python file executable in androididle python for android
- kivy app tutorial
- kivy game development
- kivy python android
- kivy youtube
- kotlin
- pip install python-for-android
- py to apk converter software
- py to apk in windows 10
- pygame to apk
- python android apk
- python android app development
- python android app development framework
- python android studio
- python download for android free
- python download for windows 10
- python download for windows 7
- python for android apk
- python for mobile download
- python kivy projects with source code
- python to apk converter online
Following tags are used to generate the procedure to build an Android app from kivyMD based python code
python, android, app, mdboxlayout, apk, code, kivymd, kivy, size, build, icon, mdcard, mdbgcolor, adaptiveheight, storycreator, gui, layout, spacing, poshint, download, version, padding, apps, development, components, import, fitimage, instagram, screen, postcard, sdl2, requirements, materialyoucolor, asyncgui, asynckivy, debug, error, distribution, develop, main, orientation, appbar, fontsize, textcolor, elevation, themebgcolor, circle, function, convert, recipe, make, clone, built, github, contents, homepagekv, bottomnav, mdlabel, height, scroll, mdrelativelayout, circularavatarimage, mdiconbutton, comment, arch, presplash, dist, recipes, hostpython3, libffi, openssl, sdl2image, sdl2mixer, sdl2ttf, sqlite3, python3, setuptools, six, pyjnius, requests, urllib3, mobile, create, windows, developed, latest, run, mdscrollview, barwidth, mdb2, avatar, themetextcolor, kv, mdb5, install, p4a, ndkapi, buildozer, phone, pydroid, developer, building, link, java, kotlin, pip, cross-platform, procedure, backend, developing, framework, element, class, mdb1, sizehinty, adaptivewidth, stories, scrollview, themeiconcolor, iconcolor, mdtopappbartrailingbuttoncontainer, facebookmessenger, content, horizontal, your, halign, center, details, relativelayout, positioned

