This post explains the full procedure of the generation of the one time password otherwise known as OTP in an Android App, sending the email to verify the OTP and further activities like access or login based on the correct OTP. This may look big and complex. Do not worry. We will break this complex issue to simple chunks and explain everything to you.
Wikipdia Says that an OTP is
“A one-time password (OTP), also known as a one-time PIN, one-time authorization code (OTAC) or dynamic password, is a password that is valid for only one login session or transaction, on a computer system or other digital device.”
Its major purpose is to validate or verify a particular user. In the present case, we will use the email based OTP verification in android . It is one of the major security checks while using any digital device.
Here the code will be written in Python and the code will be converted to a Android apk.
Table of Contents
Why we choose python for android app development
We chose python since we can run the python based in Android , Linux, Windows and Raspberry Pi PC without modifying the code. This is done without modifying the gui also. The code and gui, once written can be repurposed irrespective of the platform of use. To our knowledge, other languages such as Java and Kotlin do not possess this advantage of device independent code characteristics. Let us know if you come across this situation.
Video on How to develop and android app for email OTP verification
Download the the source code and the Android app for email OTP authentication
The python code can be accessed from this link
The apk built can be downloaded from this link
Tools used for creating the email authentication app

Procedure of the OTP verification process
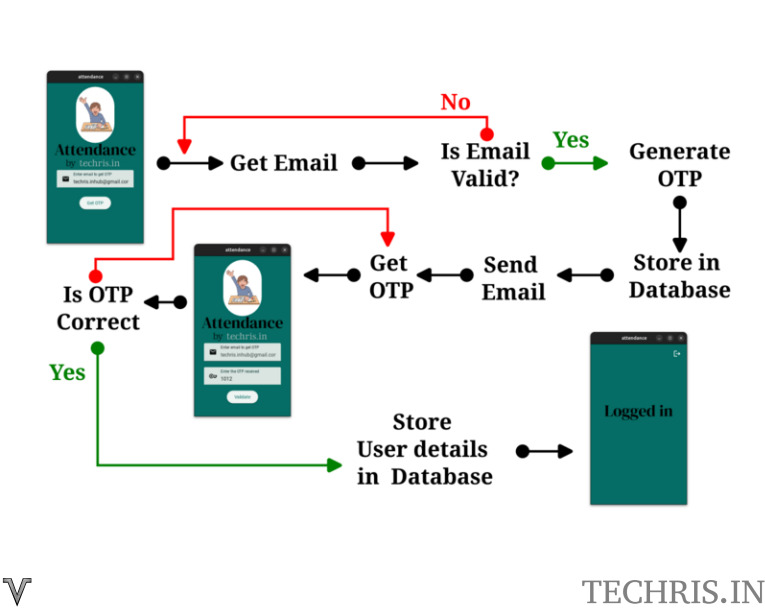
The image below shows the process diagram of the OTP generation and its verification. It has several steps. They are
- Get the email of the user
- Check whether the email is valid
- If the email is not valid ask the user to enter the correct email
- once the valid email is entered, generate a OTP consisting of random numbers
- Send the generated OTP through email and store the same in a database for the verification step
- Get the OTP entered by the user
- Check whether the OTP entered is the same as the one generated and stored in the database
- If the OTP matches the stored value, grant further access like login
- If the OTP is incorrect, inform the user the same and ask them to enter the right OTP
- The user can also be given another attempt to generate OTP again if they do not receive the first OTP generated
- Follow the same procedure above for the second OTP generated

How to generate OTP in android
While there are several OPT methods like sms, email or authenticator available, we will focus on emil based OTP verification here. As the flowchart above explains, the procedure starts with getting the email ID of the user. For this a front end or gui is required. The generation and verification of OTP is handled in the backend. Front end is made with Kivy and KivyMD which are great frameworks for the gui part of python. Backend is written in pure Python.
Lets see the steps one by one
GUI to get the email and OTP
The image below shows the placement of button or text inputs to get the email id of the user. As mentioned earlier, the gui is written in kivy and kivymd. We will explain this in detail below.

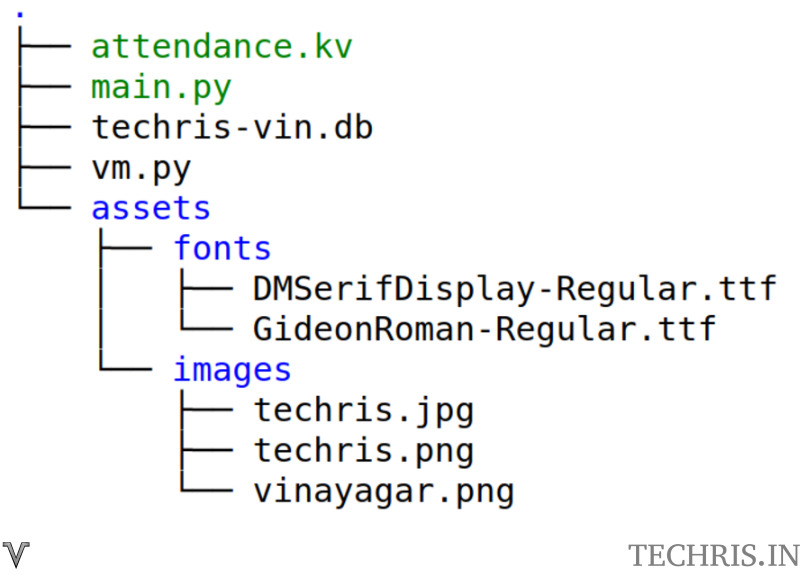
The files required for this gui can be downloaded from this link . The folder structure shown in the image below shows that the main.py is the main file which contains all the code. attendance.kv is the file for the gui layout structure written in kv language . techris-vin.db is a sqlite based database. Sqlite is a lightweight disk based database that is easy to use and it does not require any client server architecture.

Main gui shown earlier has a text input for the user to enter the email. It also has image and “Attendance by Techris.in” text and a button to get the otp. This layout is governed by the following kv file
#:import ScreenManager kivy.uix.screenmanager
#:import MDScreen kivymd.uix.screen

ScreenManager:
    id: screen_manager
	MainScreen:
	LoggedinScreen:

:
    name: "prelogin"
    # md_bg_color: self.theme_cls.backgroundColor
    md_bg_color: 0.0196,0.4275,0.3961,1
    MDFloatLayout:
        # MDIconButton:
        #     id : resendotpbutton
        #     icon: "chevron-left"
        #     # style: "tonal"
        #     padding: 15
        #     # radius: [self.height / 2, ]
        #     # halign : "center"
        #     theme_font_size: "Custom"
        #     font_size: "55sp"
        #     pos_hint: {"center_x" : -0.1, "center_y": .95}
        #     theme_text_color: "Custom"
        #     text_color: 1, 1, 1, 1
        #     ripple_scale: 0
        #     # color: 120/255, 120/255, 120/255, 1
        #     on_press : app.resettoemail()

        FitImage:
            source: "assets/images/vinayagar.png"
            size_hint : [0.4, 0.35]
            pos_hint: {"center_x": .5, "center_y": .8}
            radius: self.width / 2


        # FitImage:
        #     source: "assets/images/techris.png"
        #     size_hint: None,None #"0.2"
        #     width : root.width * 0.7
        #     fit_mode : "contain"
        #     pos_hint: {"center_x": .5, "center_y": .55}

        MDTextField:
            mode: "filled"
            id : otpemail
            size_hint_x : 0.8
            pos_hint: {"center_x": .5, "center_y": .4}
            validator: "email"

            MDTextFieldLeadingIcon:
                icon: "email"

            MDTextFieldHintText:
                text: "Enter email to get OTP"
            # MDTextFieldHelperText:
            #     text: "VV"
            #     mode: "persistent"
        MDTextField:
            mode: "filled"
            id : otpreceived
            size_hint_x : 0.8
            pos_hint: {"center_x": .5, "center_y": -.25}
            input_filter: 'int'
            MDTextFieldLeadingIcon:
                icon: "key-outline"

            MDTextFieldHintText:
                text: "Enter the OTP received"
            # MDTextFieldHelperText:
            #     text: "VV"
            #     mode: "persistent"
        MDLabel:
            text : ""
            # text : "Enter valid email"
            id : v2
            pos_hint: {"x": .15, "center_y": .32}
            bold: True
            text_color : "red" #self.theme_cls.primaryColor
            # theme_font_size: "Custom"
            # font_size: "30dp"
            # md_bg_color: self.theme_cls.backgroundColor

            # MDTextFieldTrailingIcon:
            #     icon: "information"

            # MDTextFieldMaxLengthText:
            #     max_text_length: 10

        MDButton:
            id : otpbutton
            style: "elevated"
            pos_hint: {"center_x": .5, "center_y": 0.25}
            # theme_bg_color: "Custom"
            # md_bg_color: "brown"
            ripple_scale: 0
            on_press : app.getotp()

            MDButtonText:
                text: "Get OTP"
        MDButton:
            id : validatebutton
            style: "elevated"
            pos_hint: {"center_x": .5, "center_y": -0.28}
            # theme_bg_color: "Custom"
            # md_bg_color: "brown"
            on_press : app.validateotp()

            MDButtonText:
                text: "Validate"

        MDButton:
            id : resendotpbutton
            style: "elevated"
            pos_hint: {"center_x": .7, "center_y": -0.28}
            # theme_bg_color: "Custom"
            # md_bg_color: "brown"
            on_press : app.resettoemail()

            MDButtonText:
                text: "Resend OTP"

        MDLabel:
            # text : "You can resend the OTP in 60 seconds"
            text : ""
            # text : "Enter valid email"
            id : resendcounter
            pos_hint: {"x": .05, "center_y": .04}
            bold: True
            text_color : "white" #self.theme_cls.primaryColor

        MDLabel:
            text : "Attendance"
            pos_hint: {"center_x": .5, "center_y": .57}
            bold: True
            text_color : "red" #self.theme_cls.primaryColor
            theme_font_name: "Custom"
            font_name: "assets/fonts/DMSerifDisplay-Regular.ttf"
            text_color : 0,0,0,1
            theme_font_size: "Custom"
            font_size: "50dp"
            halign : "center"
        MDLabel:
            text : "by"
            pos_hint: {"center_x": .25, "center_y": .49}
            bold: True
            text_color : "red" #self.theme_cls.primaryColor
            theme_font_name: "Custom"
            font_name: "assets/fonts/GideonRoman-Regular.ttf"
            text_color : 0,0,0,1
            theme_font_size: "Custom"
            font_size: "30dp"
            halign : "center"
        MDLabel:
            text : "techris.in"
            pos_hint: {"center_x": .55, "center_y": .49}
            bold: True
            text_color : "red" #self.theme_cls.primaryColor
            theme_font_name: "Custom"
            font_name: "assets/fonts/GideonRoman-Regular.ttf"
            text_color : 0.8,0.8,0.8,1
            theme_font_size: "Custom"
            font_size: "30dp"
            halign : "center"


:
    name: "loggedin"
    # md_bg_color: self.theme_cls.backgroundColor
    md_bg_color: 0.0196,0.4275,0.3961,1
    MDFloatLayout:
        MDLabel:
            text : "Logged in"
            pos_hint: {"center_x": .5, "center_y": .57}
            bold: True
            text_color : "red" #self.theme_cls.primaryColor
            theme_font_name: "Custom"
            font_name: "assets/fonts/DMSerifDisplay-Regular.ttf"
            text_color : 0,0,0,1
            theme_font_size: "Custom"
            font_size: "50dp"
            halign : "center"

        # MDLabel:
        #     text : "Logout"
        #     pos_hint: {"center_x": .85, "center_y": .94}
        #     bold: True
        #     text_color : "red" #self.theme_cls.primaryColor
        #     theme_font_name: "Custom"
        #     font_name: "assets/fonts/GideonRoman-Regular.ttf"
        #     text_color : 0.8,0.8,0.8,1
        #     theme_font_size: "Custom"
        #     font_size: "20dp"
        #     halign : "center"
        #     on_press : app.logout()
        MDIconButton:
            icon: "logout"
            style: "standard"
            theme_icon_color: "Custom"
            icon_color : [1,1,1,1]
            on_press : app.logout()
            pos_hint: {"center_x": 0.9, "center_y": 0.94}
Here the kv file has two screens. First screen is the main gui screen. Second screen is to show once the user is logged in. Lets focus on the main screen first. It’s name is given as prelogin and has a background colour to have a rgba values of 0.0196,0.4275,0.3961,1. The elements are placed in the MDFloatlayout. It lets us to keep the elements in any location. As mentioned earlier, this layout contains the following
It is to be noted that the MDTextField has an entry validator: “email” . This will validate the email entered and it will indicate if the email id is not valid as shown in the image below.


Contents of main.py are given below.
from kivy.uix.screenmanager import ScreenManager
from kivymd.app import MDApp
from kivy.lang import Builder
from kivy.core.window import Window
from kivy.clock import Clock
from kivy.properties import NumericProperty, StringProperty
from kivymd.uix.textfield import MDTextFieldHelperText
from kivymd.uix.label import MDLabel
import re,os, time
from kivy.properties import StringProperty, NumericProperty, Property
from kivymd.uix.screen import MDScreen

try:
    import vm_aarch64_linux_android as vm
except:
    try:
        import vm_arm_linux_androideabi as vm
    except:
        try:
            import vm_x86_64_linux_android as vm
        except:
            try:
                import vm_linux_x86_64 as vm
            except:
                print('Nothing loaded')

import sqlite3

class MainScreen(MDScreen):
	pass

class LoggedinScreen(MDScreen):
	pass

def tryquery(self,query1,query2):
    cur = self.cur
    try:
        v = cur.execute(query1).fetchall()
    except Exception as e:
        cur.execute(query2)

def execqueryifnotexist(self,query1,query2):
    cur = self.cur
    try:
        v = cur.execute(query1).fetchall()
        if len(v) == 0:
            cur.execute(query2)
            self.con.commit()
    except Exception as e:
        v = 1

def execquery(self,query1):
    cur = self.cur
    try:
        cur.execute(query1)
        if len(v) == 0:
            cur.execute(query2)
            self.con.commit()
    except Exception as e:
        v = 1

def checkqueryifexist(self,query1):
    cur = self.cur
    try:
        v = cur.execute(query1).fetchall()
        if len(v) == 0:
            return [0]
        else:
            return [1,v[0]]
    except Exception as e:
        return [0]

class attendanceApp(MDApp):
    def loadkv(self):
        Builder.load_file('loggedin.kv')

    def build(self):
        # Window.size = [300, 500]
        self.theme_cls.primary_palette = "Turquoise"
        self.ids = self.root.get_screen("prelogin").ids

        con = sqlite3.connect("techris-vin.db")
        cur = con.cursor()
        self.cur = cur
        self.con = con
        tryquery(self,"SELECT * from users","CREATE TABLE users(email text)")
        tryquery(self,"SELECT * from settings","CREATE TABLE settings(key text, value)")
        execqueryifnotexist(self,'SELECT * FROM SETTINGS WHERE key = "curemail"', 'INSERT INTO SETTINGS (key,value) VALUES ("curemail","")')
        execqueryifnotexist(self,'SELECT * FROM SETTINGS WHERE key = "curotp"', 'INSERT INTO SETTINGS (key,value) VALUES ("curotp","")')
        return

    def on_start(self):
        super().on_start()
        result = checkqueryifexist(self,'SELECT * FROM SETTINGS WHERE key = "curemail"')
        if len(result) > 1:
            if not result[1][1] == '':
                self.root.current = 'loggedin'

    def updatetimertext(self,dt):
        self.ids.resendcounter.text = "You can resend the OTP in " + str(self.seconds) + " seconds"
        self.seconds -= 1
        if self.seconds < 0:
            self.otpcountdown.cancel()
            self.ids.resendcounter.text = ""
            if vm.check(self):
                self.ids.resendotpbutton.pos_hint  = {"center_x": .7, "center_y": 0.12}
                self.ids.validatebutton.pos_hint  = {"center_x": .25, "center_y": 0.12}

    def resettext(self,dt):
        self.ids.v2.text = ''

    def getotp(self):
        email = self.ids.otpemail.text
        regex = r'\b[A-Za-z0-9._%+-]+@[A-Za-z0-9.-]+\.[A-Z|a-z]{2,7}\b'

        suppress_check = 0

        if(re.fullmatch(regex, email)) or suppress_check:
            v = 1
            if vm.check(self):
                self.ids.v2.text = 'Sending OTP'
                self.ids.v2.text_color = 'white'
                self.ids.otpbutton.disabled = True
                Clock.schedule_once(self.sendmail,1)
        else:
                name = StringProperty()
                name = 'vinayagar'
                self.ids.v2.text = 'Enter valid E-mail'

                try :
                    Clock.schedule_once(self.resettext,2)
                except Exception as e:
                    v = 1

    def sendmail(self,dt):
        self.ids.otpbutton.text = 'Sending OTP'

        result = vm.sm(self)
        self.ids.otpbutton.disabled = False

        if result[0] == 0:
            self.ids.v2.text_color = 'red'
            self.ids.v2.text = 'Error in sending OTP. Try later'
            try :
                Clock.schedule_once(self.resettext,2)
            except Exception as e:
                v = 1
        else:
            if len(result) == 2:
                self.cur.execute('UPDATE settings SET value = "' + str(result[1]) + '" WHERE key = "curotp"')
                self.con.commit()

            self.ids.otpbutton.pos_hint  = {"center_x": .5, "center_y": -0.32}
            self.ids.validatebutton.pos_hint  = {"center_x": .5, "center_y": 0.12}
            self.ids.otpreceived.pos_hint = {"center_x": .5, "center_y": .25}
            self.ids.v2.text_color = 'red'
            self.ids.v2.text = ''
            if vm.check(self):
                self.ids.resendcounter.text = "You can resend the OTP in 60 seconds"
                self.seconds = 60
                self.otpcountdown = Clock.schedule_interval(self.updatetimertext, 1)

    def resettoemail(self):
        self.ids.v2.text = ''
        self.ids.otpbutton.pos_hint  = {"center_x": .5, "center_y": 0.25}
        self.ids.validatebutton.pos_hint  = {"center_x": .5, "center_y": -0.28}
        self.ids.otpreceived.pos_hint = {"center_x": .5, "center_y": -.25}
        self.ids.resendcounter.text = ""
        self.ids.resendotpbutton.pos_hint  = {"center_x": .7, "center_y": -0.28}
        self.getotp()

    def logout(self):
        vm.lo(self)


    def validateotp(self):
        otp = self.ids.otpreceived.text
        otpdb = checkqueryifexist(self,'SELECT * FROM SETTINGS WHERE key = "curotp"')[1][1]

        if otp == str(otpdb):
            try :
                self.otpcountdown.cancel()
            except :
                v = 1
            self.cur.execute('UPDATE settings SET value = "' + self.ids.otpemail.text  + '" WHERE key = "curemail"')
            self.con.commit()
            self.root.current = 'loggedin'
        else:
            self.ids.otpreceived.text = 'Wrong OTP'

app = attendanceApp()
app.run()
Following lines will try to generate two tables and add table entries if they do not exist
tryquery(self,"SELECT * from users","CREATE TABLE users(email text)")
tryquery(self,"SELECT * from settings","CREATE TABLE settings(key text, value)")
execqueryifnotexist(self,'SELECT * FROM SETTINGS WHERE key = "curemail"', 'INSERT INTO SETTINGS (key,value) VALUES ("curemail","")')
execqueryifnotexist(self,'SELECT * FROM SETTINGS WHERE key = "curotp"', 'INSERT INTO SETTINGS (key,value) VALUES ("curotp","")')
Backend will be used to get the email and generate the OTP
The function getotp will again scrutinize the email entered and it will output error message in the layout if any error is present in the email.

When the email id entered is correct, it will send an email using the function sendmail. The get OTP button will also be disabled to prevent the user from clicking the button again while sending the OTP.
Generation and sending of the OTP is handled by the module vm.py
Following code generates the four character OTP by using the random combination of digits
def generateotp(glen = 4):
    gchars = '0123456789'
    gsl = ''.join(random.choice(gchars) for _ in range(glen))
    return gsl
Now this generated OTP has to be sent. You need to send an email containing the OTP. You can use your favorite email sending server for sending the email. There are several services available to send emails as listed below
- Sendgrid
- Mailchimp
- PostMark
- Mailersend
- Zeptomail
- Mailgun
- Mailtrap
- Mailjet
- SendPulse
- Ckicksend
- smtp2go
- Brevo
Out of these emails, zeptomail is having the lowest price to send emails. There are some free email providers available. However it is suggested to get a paid option to have a reliable delivery.
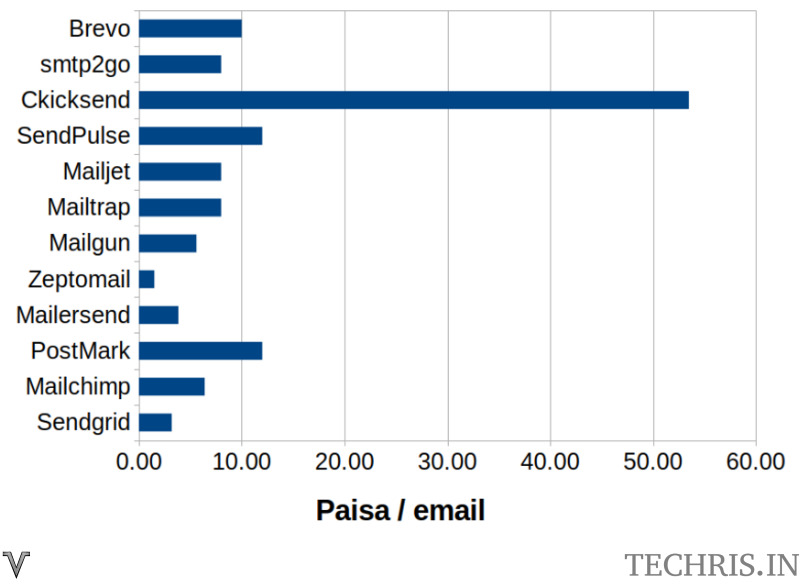
Following table compares different options the service providers provide. There are other providers also. These prices are as on the date of writing this post. These may vary. The prices will also vary based on the usage. One has to account everything while comparing these options. Contact these providers for the accurate pricing based on your usage
| Service | Paisa / email | Free plan | Min value | Validity |
| Sendgrid | 3.19 | 100 / day | 19.95 USD for 50000 | 1 month |
| Mailchimp | 6.40 | 500 | 20 USD for 25000 email | 1 month |
| PostMark | 12.00 | 100 / day | 15 USD for 10000 email | 1 month |
| Mailersend | 3.84 | 100 / day | 24 USD for 50000 email | 1 month |
| Zeptomail | 1.50 | 10000 | Rs 150 for 10000 email | 6 months |
| Mailgun | 5.60 | 5000 / month | 35 USD for 50000 email | 1 month |
| Mailtrap | 8.00 | 1000 / month | 10 USD for 10000 email | 1 month |
| Mailjet | 8.00 | 200 / day | 15 USD for 15000 email | 1 month |
| SendPulse | 12.00 | 12000 / month | 15 USD for 10000 email | 12 months |
| Ckicksend | 53.49 | Rs 13372.5 for 25000 emails | ||
| smtp2go | 8.00 | 1000 / month | 10 USD for 10000 email | 1 month |
| Brevo | 10.00 | 300 / day | 25 USD for 20000 email | 1 month |
The comparison of the price to send one transactional email is shown below.

Following code from zeptomail sends the email . For this to work you need to get the user name and password from zeptomail. The body to be modified to have the OTP text included. OTP is generated by the function generateotp.
import smtplib, ssl, random
from email.message import EmailMessage
port = 587
smtp_server = ""
username=""
password = ""
message = "Test email sent successfully."
msg = EmailMessage()
msg['Subject'] = "Test Email"
msg['From'] = ""
msg['To'] = ""
msg.set_content(message)
try:
    if port == 465:
        context = ssl.create_default_context()
        with smtplib.SMTP_SSL(smtp_server, port, context=context) as server:
            server.login(username, password)
            server.send_message(msg)
    elif port == 587:
        with smtplib.SMTP(smtp_server, port) as server:
            server.starttls()
            server.login(username, password)
            server.send_message(msg)
    else:
        print ("use 465 / 587 as port value")
        exit()
    print ("successfully sent")
except Exception as e:
    print (e)

def generateotp(glen = 4):
    gchars = '0123456789'
    gsl = ''.join(random.choice(gchars) for _ in range(glen))
    return gsl
The email received in the user inbox is shown below.

One needs to enter this in the enter OTP text field. Once the OTP is generated, the MDButton with id otpbuttonis moved and the other MDButton with ID validatebutton will be moved below the second text field that is used to enter the OTP received.

The user will also get an option to send the OTP again after 60 seconds and the time to resend the OTP will reduce by using a timer with Schedule_interval method.

Once the time of 60 seconds is expired, the user will be provided with an option to send the OTP again as seen in the image below.

Once the right OTP is entered, it will be checked against the value entered in the database and if the value matches, the value curemail is updated with the email id entered. The user will be moved to the new screen as shown in the image below.

This screen has another button to logout. If the user clicks the logout button, the curemail entry in the database table settings will be set to “”. While the app is started, it the curemail is not empty, the user will be shown the loggedin screen without showing the screen to generate an validate the OTP. This will be convenient for the user if they use the app regularly.
This is how the email OTP authentication in android works.
Convert the python code to android apk
Following code is used to convert the python code to an android apk. Please refer the detailed post on How to convert python code to a mobile app for full details.
p4a apk --private /home/gk/Documents/code --package org.techris.t1z --name "Techris Login tutorial" --version 0.1 --bootstrap sdl2 --requirements python3==3.11.2,kivy,materialyoucolor,exceptiongroup,asyncgui,asynckivy,sqlite3 --sdk-dir /home/gk/Android/Sdk --ndk-dir /home/gk/Documents/android-ndk-r25b-linux/android-ndk-r25b --android-api 34 --ndk-api 21 --arch armeabi-v7a --arch arm64-v8a --arch x86_64 --permission INTERNET --icon /home/gk/Documents/logo.png --presplash /home/gk/Documents/logo.png --presplash-color "#70AB44" --debugThis command will produce an apk file. Install this in the android phone. The authentication app installed in the android phone is shown in the image below.

Below photographs show that the app is running in android phone as well as desktop. We would like to remind you why we chose to use python app development. The same code is used to run the app in two different environments. This is the power of python.


We hope following search terms will be useful to you if you are looking for the app authentication, kivyMD, kivy, python, buildozer, python for android and android apk related queries.
- Can I get OTP on email?
- Can I get OTP on my email?
- Email otp app
- Email otp app download
- Email otp app for android
- Email otp app free
- Email otp free for otp
- Email otp free verification
- Email otp procedure pdf
- Email otp verification
- Free otp android
- How can I get OTP code?
- How can I get OTP through email?
- How do I create an OTP?
- How do I get OTP authentication?
- How do you generate a 6 digit OTP in Python?
- How to generate otp authentication
- How to make OTP in Android?
- How to send mobile OTP using Python?
- Otp android apk
- Otp android download
- Otp android github
- Otp android studio
- Otp authentication app
- Otp python example
- What is 6 digit OTP number?
- What is OTP Python?
- What is OTP app?
- What is OTP authentication?
- What is OTP in coding?
- What is OTP?
- What is an OTP Android?
- What is my OTP code?
- What is my OTP verification?
- What is the process of email OTP?
- can i get my otp in email
- email otp authentication
- email otp login
- email otp verification in android
- email op verification
- email otp
- email otp authentication
- email otp code
- email otp free
- email otp login
- email otp service
- email otp template
- email otp template html free
- email otp verification
- email otp verification api
- email otp verification in android
- email otp verification in python
- email otp verification online
- email otp verification service
- free email otp
- free email otp service
- freeotp android
- generate 6 digit otp python
- how to get free otp
- one-time password online
- otp app
- otp authentication
- otp authentication api
- otp authentication app
- otp authentication failed
- otp authentication meaning
- otp authentication provider
- otp authentication sms
- otp code
- otp edittext android github
- otp full form
- otp meaning
- otp number
- otp on the phone
- otp password example
- otp verification
- otp verification code
- otp verification in android studio without firebase
- otp view android
- otp view library android
- otp-verification in android github
- otp-verification using python github
- otp-view android github
- otp python example
- what is email otp
- what is my otp code


